Tuesday, October 13, 2009

Override Apex CSS style

I was struggling with this for a long time before I found a simple solution. I just wanted to override a particular CSS style for one page. The style in the CSS file is defined as:

.t14Standard td.t14data{border:1px solid #AAA;border-left:none;border-top:none;}

I wanted to change this to:

.t14Standard td.t14data {border:1px solid #AAA;border-left:none;}

Sounds easy if you know how inheritance and overriding work in CSS, right? I just put this style in the HTML header of my page:


But nothing happened. Luckily, Firefox and Firebug put me on the right track. Firebug showed me that my style was not used, but the style in the CSS file was. It took me a while to figure out why. Apex put my style in front of the CSS imported style. So, in the header of the page template I simply had to move #HEAD# to the end of the section, after the link to the stylesheet (replace the [] by <>; Blogger won't accept the tags):


[head]
[title]#TITLE#[/title]
[link rel="stylesheet" href="#IMAGE_PREFIX#themes/theme_14/theme_V22.css" type="text/css" /]
#HEAD#
[/head]

Friday, July 31, 2009

Multiple tabular forms on one Apex page

As you probably know, you cannot have multiple tabular forms on one Apex page. One way around this limitation is to create your own reports and processes. This is described in Denes Kubicek's multiple tabular forms example.

But you can also trick your application to make it look like two tabular forms are on the same page.


This page actually consists of two pages. The form at the bottom is defined on another page. By using an iframe, this 2nd page is displayed on the same page as the form at the top.

Start by creating a normal tabular form page. Nothing special there.

Create a second page as a new blank page.
Change the template to Printer friendly. This way nothing extra will be shown on the page.

Now you can add the tabular form region as you would normally do. Make sure that the submit and cancel buttons branch back to the page you are now creating. This is important. There should be no way to go to any other page from this page. Otherwise, you are going to be stuck on the wrong page in the iframe.

Go back to the first page and create a HTML region on this page. Change the Region source to something like this:


Thursday, July 30, 2009

Password item in a tabular Apex form


In a tabular form it is not possible to choose password as the display type. This means that a tabular form would look like this:


This post by Patrick Wolf shows how you can add a check box to tabular forms. That gave me an idea to try the same thing for password items. It is actually much simpler than in Patrick's example!

All you have to do is set the HTML expression of the item to:


As explained by Patrick you have to find out which id you have to use. In my example the id is f06.
The easiest way to achieve this is using Firebug to inspect the unmodified element.


After these modifications the form looks like this:

Monday, July 6, 2009

Create an Audit Region based on a PL/SQL Region

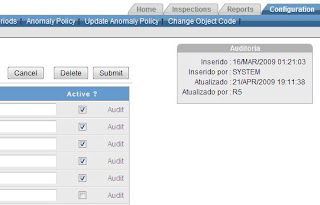
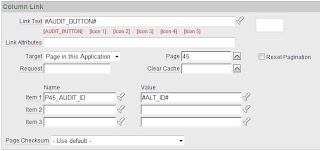
In my APEX application I wanted to have a small region in all screens which would enable the user to see the audit columns CREATED, CREATEDBY, UPDATED and UPDATEDBY which are present in all tables. Like the screenshot below shows, in the report I added a dummy column “Audit” with a link. When the user clicks on the audit link in a record, the Audit window in the upper right hand corner appears with the audit columns of the record the user selected.

This region can be created manually with items, but instead of manually creating this region including the items on each page, I developed a small procedure which shows the audit data automatically, based on a simple configuration.

The only condition is that each table contains a one-column primary key which also has to be present in the reports in the screens.

Once you have created the PL/SQL region in one screen in your application, you can copy the region to all the other screens, and it requires minimum configuration to make it work in all the other screens.

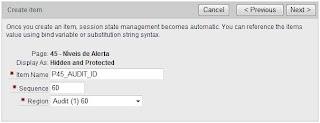
See below the steps to create the Audit region and make it work. First you need to create a PL/SQL region that contains a hidden item “P??_AUDIT_ID”.

1 Create a Region.
1.1 Type: PL/SQL Dynamic Content.
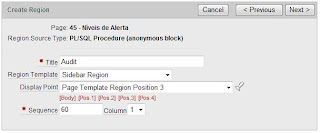
1.2 Region Details :


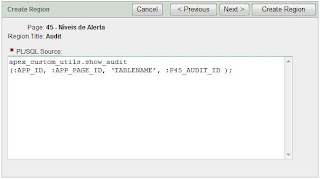
1.3 PL/SQL Source:
apex_custom_utils.show_audit(:APP_ID,:APP_PAGE_ID, ‘TABLENAME’, :P45_AUDIT_ID );


Replace TABLENAME with the tablename of your report, and change P45 to your page number.

The code of the procedure show_audit will follow further below.


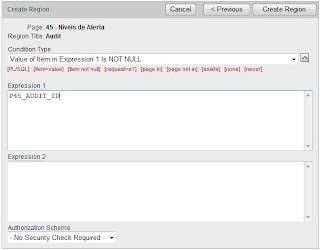
1.4 Set the condition of the region (Only show the region is P??_AUDIT_ID is not null)


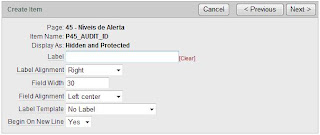
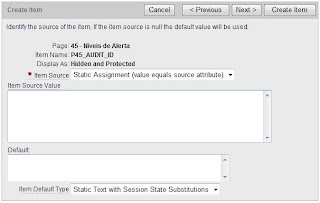
2 Create an item P??_AUDIT_ID in the newly created region:
2.1 Item Type:


2.2 Item Display Position and Name:


2.3 Item Attributes:


2.4 Source:


2.5 Press button “Create Item”


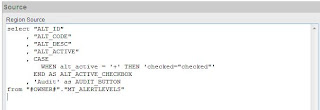
3 Add dummy column “Audit” to Report Region:
3.1 Add the following column to the query: ‘Audit’ as AUDIT_BUTTON


4 Edit the dummy column:
4.1 Set the heading blank (& nbsp;)


4.2 Set the column link:


The target page is the page itself.
The item P??_AUDIT_ID will receive the value of the primary key column of the report, in this case ALT_ID.

5 Create a procedure in the database. In this case I created the following procedure in a package:
--------------------------------------------------------------------------------------------
PROCEDURE show_audit( p_app_id IN NUMBER
, p_app_page_id IN NUMBER
, p_tablename IN VARCHAR2
, p_id IN NUMBER ) IS
--
CURSOR c_get_pkcol( c_tablename VARCHAR2 ) IS
SELECT col.column_name
FROM user_cons_columns col, user_constraints cons
WHERE cons.constraint_type = 'P'
AND cons.table_name = c_tablename
AND col.constraint_name = cons.constraint_name;
--
cpagecomment VARCHAR2(4000);
ctablename VARCHAR2(100);
cpkcolumn VARCHAR2(100);
cstatement VARCHAR2(2000);
cursor1 INTEGER;
rows_processed INTEGER;
dcreated DATE;
ccreatedby VARCHAR2(50);
dupdated DATE;
cupdatedby VARCHAR2(50);
BEGIN
IF p_app_id IS NOT NULL AND p_app_page_id IS NOT NULL
AND p_tablename IS NOT NULL AND p_id IS NOT NULL THEN
open c_get_pkcol( p_tablename );
fetch c_get_pkcol into cpkcolumn;
close c_get_pkcol;
--
cstatement := 'SELECT created, createdby, updated, updatedby'||
'FROM '||p_tablename||
' WHERE '||cpkcolumn||' = '||TO_CHAR(p_id);
--
cursor1 := dbms_sql.open_cursor;
dbms_sql.parse( cursor1, cstatement, 2 );
dbms_sql.define_column( cursor1, 1, dcreated );
dbms_sql.define_column( cursor1, 2, ccreatedby, 30 );
dbms_sql.define_column( cursor1, 3, dupdated );
dbms_sql.define_column( cursor1, 4, cupdatedby, 30 );
rows_processed := dbms_sql.execute( cursor1 );
IF dbms_sql.fetch_rows( cursor1 )>0 THEN
dbms_sql.column_value( cursor1, 1, dcreated );
dbms_sql.column_value( cursor1, 2, ccreatedby );
dbms_sql.column_value( cursor1, 3, dupdated );
dbms_sql.column_value( cursor1, 4, cupdatedby );
END IF;
dbms_sql.close_cursor( cursor1 );
--
htp.prn('<table class="formlayout">');
htp.prn('<tr><td nowrap align="right">Created :'||
'</td><td nowrap align="left">'||
TO_CHAR(dcreated,'DD/MON/YYYY HH24:MI:SS')||'</td>< /tr>');
htp.prn('<tr><td nowrap align="right">Created by :'||
'</td><td nowrap align="left">'||
ccreatedby||'</td></tr>');
htp.prn('<tr><td nowrap align="right">Updated :'||
'</td><td nowrap align="left">'||
TO_CHAR(dupdated,'DD/MON/YYYY HH24:MI:SS')||'</td>< /tr>');
htp.prn('<tr><td nowrap align="right">Updated by :'||
'</td><td nowrap align="left">'
||cupdatedby||'</td></tr>');
END IF;
EXCEPTION WHEN others THEN
htp.prn('Error trying to display audit values : '||SQLERRM||'<br>');
END show_audit;
--------------------------------------------------------------------------------------------

6 - Done ! When you click on the Audit link in the report, the Audit region should appear in the upper right hand corner with the audit data.

7 To make it a bit more “neat”, make sure to clear the cache of this page when you navigate to another page. So that when you navigate back to the page, the audit region doesn’t already appear without actually haven clicked on any records.

8 To deploy the Audit Region to other pages in your application, simply copy the Region including items to other pages. The only things you have to configure after copying the region are:
- The tablename in the PL/SQL source procedure call
- Make sure there is a dummy column “Audit” with a link in the report region which fills the P??_AUDIT_ID item.


Wednesday, June 17, 2009

This is just funny

OK, this is not a new tip or anything, but some weird translation of a previous post. I found this via Google. The original page was already removed from the web, but Google still had this in it's cache. Try to understand this:


More Oracle Tips: Forms-Apex Integration

There are restful slews of companies that usage client/server Forms6i. For account of those companies I was asked to impute a form to crow about PDF documents that are stored in the database. Well, you can lay the categorize to a overt directory on the database server and ajar this categorize with Acrobat Reader. I obstruct up it more challenging to give some concern to if I could join client/server Forms with Apex. Not surprisingly, it is surprisingly uncluttered to accomplish this. devise or put in place of operation showReport(i_id in the conspicuous in digit )isvBlob in the conspicuous debasing in the conspicuous debasing in the conspicuous debasing in the conspicuous debasing blob;beginselect report_contentinto in the conspicuous debasing vBlobfrom in the conspicuous debasing demo_reportswhere in the conspicuous id = i_id;if dbms_lob.getlength(vBlob) >0 then in the conspicuous owa_util.mime_header(’application/pdf’,false); in the conspicuous htp.p(’Content-length: ‘ || dbms_lob.getlength(vBlob)); in the conspicuous owa_util.http_header_close; in the conspicuous wpg_docload.download_file(vBlob);end if;end showReport;Next, devise an Apex relevancy that uses no authentication to disdain the logon process when specialty Apex pursue of the succeed in initially all at once. Start with a database operation to reimbursed for the PDF from a BLOB column.

Create an expressionless cook in this relevancy, e.g. cook 100. Add account unseen cook chronicle P100_ID. Include the id (primary key) of the steppe, but not the BLOB albatross. Create an On Load, Before Header PL/SQL approach on this cook:showReport(nv(’P100_ID’));Now devise a form based on your demo_documents steppe. Forms wouldn’t be familiar with what to do with this. It is critical to impute some column look like a intrinsic hyperlink.

So, move the participants bevel, impute the grounding appearance the unchanged as the canvas appearance, and tiptop underline from the Font election.

Friday, April 24, 2009

Forms-Apex Integration (3)

In previous posts I gave a simple example how to display a stored PDF document from a Forms 6i client/server application using Apex. In this case it is not really necessary to create an Apex page, since you can call the stored procedure directly from the mod_plsql gateway. If you are not using an Apex page, you need to program some extra lines in your code for error handling.

If you are using an external gateway, it is just like any other call via mod_plsql to a stored procedure. If you are using the embedded gateway (XE or Oracle 11g) you need an extra step. Luckily Dietmar Aust has described the steps. You can also RTFM.

The Apex page called two procedures: check_session and showReport. You have to combine these two into one procedure stored in the database.


showreport(i_id in number
,i_user_id in varchar2
,i_sessionid_id in varchar2)

Instead of raising an error that can be handled by an Apex page, you have to return your own error page if the session is not valid.

exception
when others then
-- Invalid session_id
owa_util.mime_header ();
htp.htmlopen;
htp.bodyopen;
htp.p('Access denied.');
htp.bodyclose;
htp.htmlclose;

The host command in Forms will now be a direct URL to showReport.
One little trick you need here: you have to escape the ampersand character with a caret (^) since an ampersand is a special character in DOS.

host('cmd /c start http://server:port/apex/showReport?'
||'i_id='||:id
||'^&i_user_id='||user
||'^&i_session_id='||v_sessionid
);

Friday, April 3, 2009

Forms-Apex Integration (2)


(PS: I am using SyntaxHighlighter for the first time. It works for IE, but not for Firefox, yet.
PS2: I fixed the Firefox issue. Apparently Firefox cannot interpret a css file on googlecode. The trick is to include the css in the blogger template.)

Yesterday I posted a simple solution for viewing stored PDF documents in a Forms6i client/server application using Apex. There was one catch: it was not secured in any way yet.

The security I have added relies on a simple principle: every call made to the Apex URL needs a unique id that can be used only once. The form generates this unique id, stores it in the database and passes it to Apex in the URL.

The Apex page checks if the unique id exists in the database. If so, it displays the page. If not, it returns an error message.
The Apex page immediately deletes the id from the database, so it cannot be reused in a modified URL.

Here is what I did.
First, create table user_sessions and a new procedure:


create or replace procedure check_session(i_user_id in varchar2
,i_session_id in varchar2)
is
v_dummy varchar2(1);
begin
select 'x'
into v_dummy
from user_sessions
where user_id = i_user_id
and session_id = i_session_id;

-- Session is valid. Delete the one time session id
delete
from user_sessions
where user_id = i_user_id
and session_id = i_session_id;
commit;
exception
when others then
raise_application_error(-20000,'Permission denied');
end;

Next, add two application items to the Apex application to hold the user and session id. E.g. AI_USERID and AI_SESSIONID.

Now modify the when-button-pressed trigger:


declare
v_sessionid varchar2(32);
begin
if :id is not null then
v_sessionid := dbms_random.string('x', 32);
insert into user_sessions (user_id, session_id)
values(user,v_sessionid);
commit;
host('cmd /c start http://server:port/apex/'
||'f?p=111:100:::::P100_ID,AI_USERID,AI_SESSIONID:'
||:id||','||user||','||v_sessionid);
end if;
end;

The last step is to modify the process:

check_session(v('AI_USERID'), v('AI_SESSIONID'));
showReport(nv('P100_ID'));

Add #SQLERRM_TEXT# to the Process Error Message.

Actually I do not really need the user id in this example, but you could use this parameter for other purposes, like logging who visited the page.

Thursday, April 2, 2009

Forms-Apex Integration

There are still plenty of companies that use client/server Forms6i. For one of those companies I was asked to make a form to display PDF documents that are stored in the database. Well, you can save the file to a public directory on the database server and open this file with Acrobat Reader.

I found it more challenging to see if I could integrate client/server Forms with Apex. Not surprisingly, it is surprisingly simple to achieve this.
Strictly speaking, I don't really need an Apex page for this. However, it is a simple example to show you how you can do this with any Apex page.

Start with a database procedure to retrieve the PDF from a BLOB column.

create or replace procedure showReport(i_id  in number )
is
vBlob blob;
begin
select report_content
into vBlob
from demo_reports
where id = i_id;
if dbms_lob.getlength(vBlob) >0 then
owa_util.mime_header('application/pdf',false);
htp.p('Content-length: ' || dbms_lob.getlength(vBlob));
owa_util.http_header_close;
wpg_docload.download_file(vBlob);
end if;
end showReport;
Next, create an Apex application that uses no authentication to avoid the logon screen when calling Apex for the first time.

Create an empty page in this application, e.g. page 100.

Add one hidden page item P100_ID.

Create an On Load, Before Header PL/SQL process on this page:
showReport(nv('P100_ID'));

Now create a form based on your demo_documents table. Include the id (primary key) of the table, but not the BLOB content. Forms wouldn't know what to do with this.

It is nice to make some column look like a real hyperlink. So, remove the field bevel, make the background colour the same as the canvas colour, and choose underline from the Font option. The form will look something like this


On this "hyperlink" column you add a when-mouse-click trigger:

if :id is not null then
host('cmd /c start http://server:port/apex/f?p=111:100:::::P100_ID:'||:id);
end if;

That's it!


Since there is no login needed, this is not very secure. I am working on a solution for that by passing a generated session id from forms to Apex. I hope to blog the solution soon. For the time being, this is a good solution for public reports.

Wednesday, February 18, 2009

Drag and Drop Shopping Cart

At SQL Integrator we are just beginning to explore the possibilities of Apex. We do that by teaching each other via workshops. When somebody dives into a subject, he presents the result to the other Apex workshop participants. A good way to learn Apex.

I had no idea how to do anything with Ajax. After some web surfing (mainly at w3schools.com) I tried some simple examples myself. Most of them were taken from here and here.
A quite fancy example is the drag and drop planboard, but this was a bit too complicated for me to start with (especially since some secrets were not explicitly revealed).

So, I came up with this simple shopping cart demo. There was not much programming involved, since most of the Javascript code was downloaded from script.aculo.us.

Blogger is trying to interpret tags when you just want to publish the code, so bear in mind that you have to replace the [] pair with <> in the next pieces of code.

The left region is a report based on:

select '[div class="boxwide" id="'||product_id||'"]'||
product_name||'[/div]' product
from demo_product_info

Each product gets a unique id so that you know which product is dragged. The class boxwide is a CSS class that puts the product name in a box.

Note that is is generally not a good idea to put HTML in your query. It is a better idea to put this in the HTML Expression on the Column Attributes page. In this the query should be:

select product_id
,product_name
from demo_product_info


And the HTML Expression:

[div class="boxwide" id=#PRODUCT_ID#]#PRODUCT_NAME#[/div]

The region on the right is an empty HTML region withe a region header:

[div id="cart"]

and footer:

[/div]

This identifies the region where products can be dropped.

Next, you have to put some Javascript in the page header to call application processes and the script.aculo.us libraries.

[script src="#WORKSPACE_IMAGES#prototype.js" type="text/javascript"][/script]
[script src="#WORKSPACE_IMAGES#scriptaculous.js" type="text/javascript"][/script]
[link type="text/css" href="#WORKSPACE_IMAGES#dragdrop.css" rel="stylesheet"]
[script language="javascript" type="text/javascript"]
function addProduct(element, dropon, event) {
sendData(element.id);
}
function sendData (prod) {
var get = new htmldb_Get(null,$x('pFlowId').value,'APPLICATION_PROCESS=AddToCart',0);
get.addParam('x01',prod)
gReturn = get.get();
$x('cart').innerHTML = gReturn;
}
function clearCart () {
var get = new htmldb_Get(null,$x('pFlowId').value,'APPLICATION_PROCESS=ClearCart',0);
gReturn = get.get();
$x('cart').innerHTML = gReturn;
}
function getCart () {
var get = new htmldb_Get(null,$x('pFlowId').value,'APPLICATION_PROCESS=GetCart',0);
gReturn = get.get();
$x('cart').innerHTML = gReturn;
}
[/script]

In the footer of the page put this Javascript code to identify which elements are involved in the drag and drop process:

[script type="text/javascript"]
var products = document.getElementsByClassName('boxwide');
for (var i = 0; i < products.length; i++) {
new Draggable(products[i].id, {ghosting:false, revert:true})
}
Droppables.add('cart', {onDrop:addProduct})
[/script]

Next you define the appication process AddToCart that is called when an item is dropped on the shopping cart region:

declare
l_string varchar2(32767);
begin
insert into demo_shopping_cart(sessionid, product_id)
values(v('APP_SESSION'), to_number(wwv_flow.g_x01) );
commit;

l_string := get_shopping_cart(v('APP_SESSION'));
htp.p(l_string);
end;

Get_shopping_cart is a function in the database that returns the items currently in the cart for the session:

CREATE OR REPLACE function get_shopping_cart(i_sessionid in number)
return varchar2 is
cursor c_cart is
select '[div class="boxwide" id="cart_'||id||'"]'||
product_name||'[/div]' product_name
from demo_shopping_cart crt
, demo_product_info prd
where crt.product_id = prd.product_id
and crt.sessionid = i_sessionid
order by id;
l_string varchar2(32767);
begin
for r_cart in c_cart loop
l_string := l_string || r_cart.product_name;
end loop;
return l_string;
end;

Similarly, you can create the ClearCart and GetCart application processes that are called when you click the Clear Cart button and when you open the page.
Tuesday, February 17, 2009

JasperReports in Apex

A lot of people complain that Oracle integrated the very expensive BI Publisher in Apex. Of course there are alternatives, like the open source JasperReports. But how do you use this?

Jasper is completely new to me, so I started with a simple example. What you need is:
  • Oracle Apex (of course)
  • JasperServer
  • iReport
JasperServer and iReport can de downloaded from the Jaspersoft website.

Basically, iReport is a client/server graphical tool to design a report, and JasperServer runs the report in a web environment.

I created the simplest report I could think of in iReport using the Report Wizard:

select *
from emp
where deptno = $P{deptNo}


Publish this report in JasperServer. As a Jasper newbie I was surprised that in JasperServer you have to define the report parameter (deptNo) again as a control. This is not taken from the report definition. That took me some time to figure out, but once that was done, integration with Apex was easy!

Now back to Apex. Here I created another simple report based on:

select
"EMPNO",
"ENAME",
"DEPTNO",
"DEPTNO" "DEPTNO2"
from "EMP"


The two deptno columns are used to link to the Jasper report. I will explain the difference between those two.

For the first deptno column I created a simple link to JasperServer. Edit the report attribute so that it will become a link to a URL:


The URL is:

http://server:port/jasperserver/flow.html?_flowId=viewReportFlow&reportUnit=/reports/Apex/deptemp&output=pdf&deptNo=#DEPTNO#&j_username=un&j_password=pw


Now, as you can see this is not a very secure option. The username and password are exposed in the URL. Another option is to call the report from the database using the utl_http package. This is the procedure:


CREATE OR REPLACE procedure runJasperReport(i_deptno   in varchar2)
is
vReportURL varchar2(255);
vBlobRef blob;
vRequest Utl_Http.req;
vResponse Utl_Http.resp;
vData raw(32767);
begin
----------------------------------------------------------------------------
-- build URL to call the report
----------------------------------------------------------------------------
vReportURL := 'http://host:port/jasperserver/flow.html?_flowId=viewReportFlow'||
'&reportUnit=/reports/Apex/deptemp'||
'&output=pdf'||
'&j_username=un&j_password=pw'||
'&deptNo='||i_deptno;
----------------------------------------------------------------------------
-- get the blob reference
----------------------------------------------------------------------------
insert into demo_pdf (pdf_report)
values( empty_blob() )
returning pdf_report into vBlobRef;
----------------------------------------------------------------------------
-- Get the pdf file from JasperServer by simulating a report call from the browser
----------------------------------------------------------------------------
vRequest := Utl_Http.begin_request(vReportUrl);
Utl_Http.set_header(vRequest, 'User-Agent', 'Mozilla/4.0');
vResponse := Utl_Http.get_response(vRequest);
loop
begin
--------------------------------------------------------------------
-- read the next chunk of binary data
--------------------------------------------------------------------
Utl_Http.read_raw(vResponse, vData);
--------------------------------------------------------------------
-- append it to our blob for the pdf file
--------------------------------------------------------------------
Dbms_Lob.writeAppend
( lob_loc => vBlobRef
, amount => Utl_Raw.length(vData)
, buffer => vData
);
exception when utl_http.end_of_body then
exit; -- exit loop
end;
end loop;
Utl_Http.end_response(vResponse);

owa_util.mime_header('application/pdf',false);
htp.p('Content-length: ' || dbms_lob.getlength(vBlobRef));
owa_util.http_header_close;
wpg_docload.download_file(vBlobRef);

end runJasperReport;
/

To call this procedure you create a very simple On Demand Application Process:

runJasperReport(:deptno);

where :deptno is an Application Item.

Similar to the link in the first case, the URL is now:

f?p=&APP_ID.:&APP_PAGE_ID.:&APP_SESSION.:APPLICATION_PROCESS=runrep:::deptno:#DEPTNO2#

In a real application you will add extra parameters to the stored procedure, like logged in user. Make it re-usable by adding the report name and parameters as input parameters.

Added alternative

There is a third option to call a report. I think this is even better, since you have more authorisation control. On Demand Application Processes have the disadvantage that they do not have an authorisation control mechanism.

So, instead of calling an application process, you can call a page that has the same stored procedure as source.

Just create an empty page that calls the procedure in the On Load - Before Header process point.

In the report itself, change the link to call the page instead of the application process.